
Sharing a domain registered with Route53 and using subdomains to separate each account in an organization is complex. A domain registered with Route53 can only belong to a single account, so we must manage resources across both accounts in order to route traffic effectively.
Before We Start
For this guide, we will set up the following domain scheme for our environments:
*.macklin.xyz→ Production*.dev.macklin.xyz→ Development
Architecture
The architecture for this guide will align with the following diagram;
Building Blocks
Route 53
We’ll use Route 53 to create Hosted Zones that act as containers for groups of four name servers spread across 4 top level domains. We’ll use Record Sets to specify additional DNS records which will direct traffic between accounts. We’ll also use Route 53 to register the domain.
Certificate Manager
It would be irresponsible to open our account up to public internet traffic without enabling HTTPS. Certificate Manager will handle the provisioning and management of our TLS certificates.
CloudFormation
We’ll be making a deliberate effort to keep the configuration as minimal and default as possible. While there may be more advanced tools for deploying infrastructure-as-code, I respect CloudFormation in some part for it’s simplicity. However, there is no reason not to use other tools such as Terraform or Pulumi if preferred.
Configuration
ℹ️ The following steps are considered prerequisites, but can be skipped if you have already completed them.
AWS Organization with Multiple Accounts
When using the AWS Organizations feature to provision and manage multiple accounts, a typical recommendation for teams is to deploy each of their environments to separate AWS accounts. This post assumes you have set up your account with AWS Organizations and are using it to automatically provision and manage additional accounts.
For this guide, we have one account for the Production environment and one for the Development environment, both managed by the root account.
Register a Domain with Route 53
When a domain is registered using Route 53 it can only belong to a single account. We are going to use the Production account for this.
In the Route 53 dashboard in the AWS Console, select Registered Domains. Then, select an available domain using the search feature and follow the steps to purchase and register your domain.
Install jq
In order to automate some parts of this process, we will use jq, a tool to parse JSON data in the terminal.
- For macOS, use Homebrew →
brew install jq. - For Windows, use Chocolatey →
choco install jq. - For other operating systems, follow this guide.
Install the AWS CLI
We will be using the AWS CLI in order to automate a lot of the steps involved in this process and to avoid needing to click around in the console.
- For macOS, use Homebrew →
brew install awscli. - For Windows, use Chocolatey →
choco install awscli. - For other operating systems, follow this guide.
Configure the AWS CLI
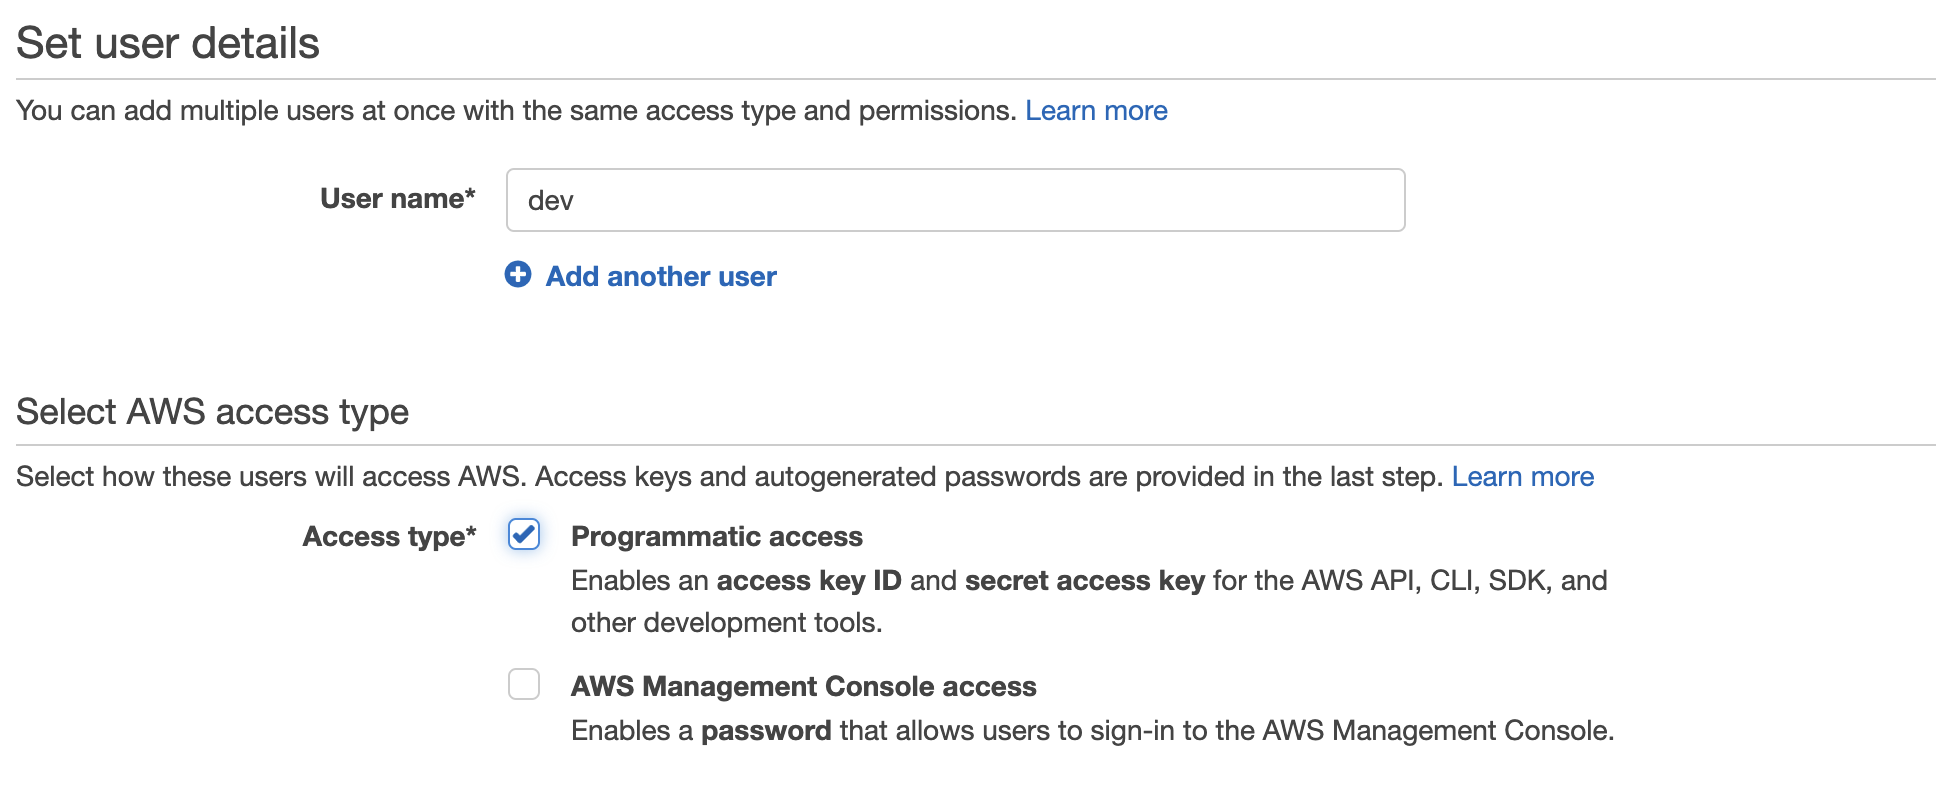
Firstly, create a new user using IAM in the AWS Console. Under ‘Select AWS access type’, select ‘programmatic access’ and continue.
For the purposes of this guide, I have attached this user to the AdministratorAccess policy, but for security reasons this is NOT RECOMMENDED. Take the time to create a user with access to the services you need, which will be Route 53, Certificate Manager and CloudFormation.
At the end of the user setup you will be able to copy the Access Key ID and Secret Access Key. Save them in preparation for the next step.
Use aws configure to set up a profile for managing resources in the Development environment and when prompted, enter the Access Key ID and Secret Access Key from before:
$ aws configure --profile dev
AWS Access Key ID [None]: *********************AWS Secret Access Key [None]: ***************************************Default region name [None]: us-west-1Default output format [None]: json
Check your configuration using aws iam list-access-keys and confirm the expected output:
$ aws iam list-access-keys --profile dev
{    "AccessKeyMetadata": [        {            "UserName": "dev",            "AccessKeyId": "*********************",            "Status": "Active",            "CreateDate": "2020-09-19T00:00:00+00:00"        }    ]}
Repeat the above steps for the Production account, retrieving your Access Key ID and Secret Access Key from the AWS console in the Production account.
$ aws configure --profile prod
AWS Access Key ID [None]: *********************AWS Secret Access Key [None]: ***************************************Default region name [None]: us-west-1Default output format [None]: json

$ aws iam list-access-keys --profile prod
{    "AccessKeyMetadata": [        {            "UserName": "prod",            "AccessKeyId": "*********************",            "Status": "Active",            "CreateDate": "2020-09-19T00:00:00+00:00"        }    ]}
Development Environment
Below is the template for provisioning the Hosted Zone using Route 53, and Certificate using Certificate Manager. Copy the template and save it to your working directory as dev-dns.yml.
AWSTemplateFormatVersion: '2010-09-09'Description: 'Provisions DNS infrastructure for the Development Environment'
Parameters:  HostedZoneDomain:    Type: String
Resources:  HostedZone:    Type: AWS::Route53::HostedZone    Properties:      Name: !Ref HostedZoneDomain
  Certificate:    Type: AWS::CertificateManager::Certificate    Properties:      DomainName: !Ref HostedZoneDomain      DomainValidationOptions:        - DomainName: !Ref HostedZoneDomain          HostedZoneId: !Ref HostedZone      ValidationMethod: DNS      Tags:        - Key: Name          Value: certificate
Next, run the following to create a new stack using CloudFormation:
$ aws cloudformation create-stack --template-body file://dev-dns.yml \ --stack-name dns --profile dev --parameters \ ParameterKey=HostedZoneDomain,ParameterValue='dev.macklin.xyz'ℹ️ For convenience, I have automated the above steps for provisioning the development environment with this shell script available from Github.
If you’re watching and waiting for your CloudFormation stack to deploy, you’ll notice it will remain in the CREATE_IN_PROGRESS state indefinitely. This is because your certificate request is waiting to be validated by AWS, which cannot happen until we have also set up the Production environment (see here for more information).
It is okay to proceed in the meantime - the stack will move into the CREATE_COMPLETE state once this guide is complete.
Name Server (NS) Records
Next, we’re going to use the AWS CLI to extract the NS records that were assigned to the newly created Hosted Zone in Route 53. Since we’re aiming to automate this process, we’re going to use the AWS CLI to retrieve the 4 NS records associated with the freshly provisioned Hosted Zone.
Run the following in a terminal window to first retrieve the Hosted Zone ID for the Development environment:
$ aws route53 list-hosted-zones-by-name \ --dns-name macklin.xyz. --profile dev \ | jq -r '.HostedZones[0].Id'/hostedzone/Z095EXAMPLEGW15BTTBNow we’ll flex some muscle with JQ to list the record sets for the Hosted Zone, selecting its associated NS Records. Run the following in a terminal window:
$ aws route53 list-resource-record-sets \ --hosted-zone-id /hostedzone/Z095EXAMPLEGW15BTTB --profile dev \ | jq -r '.ResourceRecordSets' | jq -r 'map(select(.Type == "NS"))' \ | jq -r '.[0].ResourceRecords' | jq -r 'map(.Value)'[ "ns-1077.awsdns-06.org.", "ns-935.awsdns-52.net.", "ns-452.awsdns-56.com.", "ns-1911.awsdns-46.co.uk."]This will extract the NS records that are associated with the Hosted Zone. Save the output as we will need it later.
Production Environment
Below is the CloudFormation template we will use to provision infrastructure in the Production environment. Copy the template and save it to your working directory as prod-dns.yml.
AWSTemplateFormatVersion: '2010-09-09'Description: 'Provisions DNS infrastructure for the Production Environment'
Parameters:  HostedZoneId:    Type: String  HostedZoneDomain:    Type: String  DevHostedZoneDomain:    Type: String  DevNameServer1:    Type: String  DevNameServer2:    Type: String  DevNameServer3:    Type: String  DevNameServer4:    Type: String
Resources:  Certificate:    Type: AWS::CertificateManager::Certificate    Properties:      DomainName: !Ref HostedZoneDomain      DomainValidationOptions:        - DomainName: !Ref HostedZoneDomain          HostedZoneId: !Ref HostedZoneId      ValidationMethod: DNS      Tags:        - Key: Name          Value: certificate
  DevNameServers:    Type: AWS::Route53::RecordSet    Properties:      HostedZoneId : !Ref HostedZoneId      Name: !Ref DevHostedZoneDomain      ResourceRecords:      - !Ref DevNameServer1      - !Ref DevNameServer2      - !Ref DevNameServer3      - !Ref DevNameServer4      TTL: '300'      Type: NS
Run the following in a terminal window to first retrieve the Hosted Zone ID for the Production environment (this Hosted Zone was created on your behalf when you registered the domain):
$ aws route53 list-hosted-zones-by-name \ --dns-name macklin.xyz. --profile prod \ | jq -r '.HostedZones[0].Id'/hostedzone/Z095EXAMPLEGW15BTTBNext, run the following to create a new stack using CloudFormation, replacing the values such as HostedZoneId, HostedZoneDomain, DevHostedZoneDomain, and the four NS Records from before:
$ aws cloudformation create-stack --template-body file://prod-dns.yml \ --stack-name dns --profile prod --parameters \ ParameterKey=HostedZoneId,ParameterValue='Z095EXAMPLEGW15BTTB' \ ParameterKey=HostedZoneDomain,ParameterValue='macklin.xyz' \ ParameterKey=DevHostedZoneDomain,ParameterValue='dev.macklin.xyz' \ ParameterKey=DevNameServer1,ParameterValue='ns-1077.awsdns-06.org.' \ ParameterKey=DevNameServer2,ParameterValue='ns-935.awsdns-52.net.' \ ParameterKey=DevNameServer3,ParameterValue='ns-452.awsdns-56.com.' \ ParameterKey=DevNameServer4,ParameterValue='ns-1911.awsdns-46.co.uk.'ℹ️ For convenience, I have automated the steps above for provisioning the production environment with this shell script available from Github.
What’s Next?
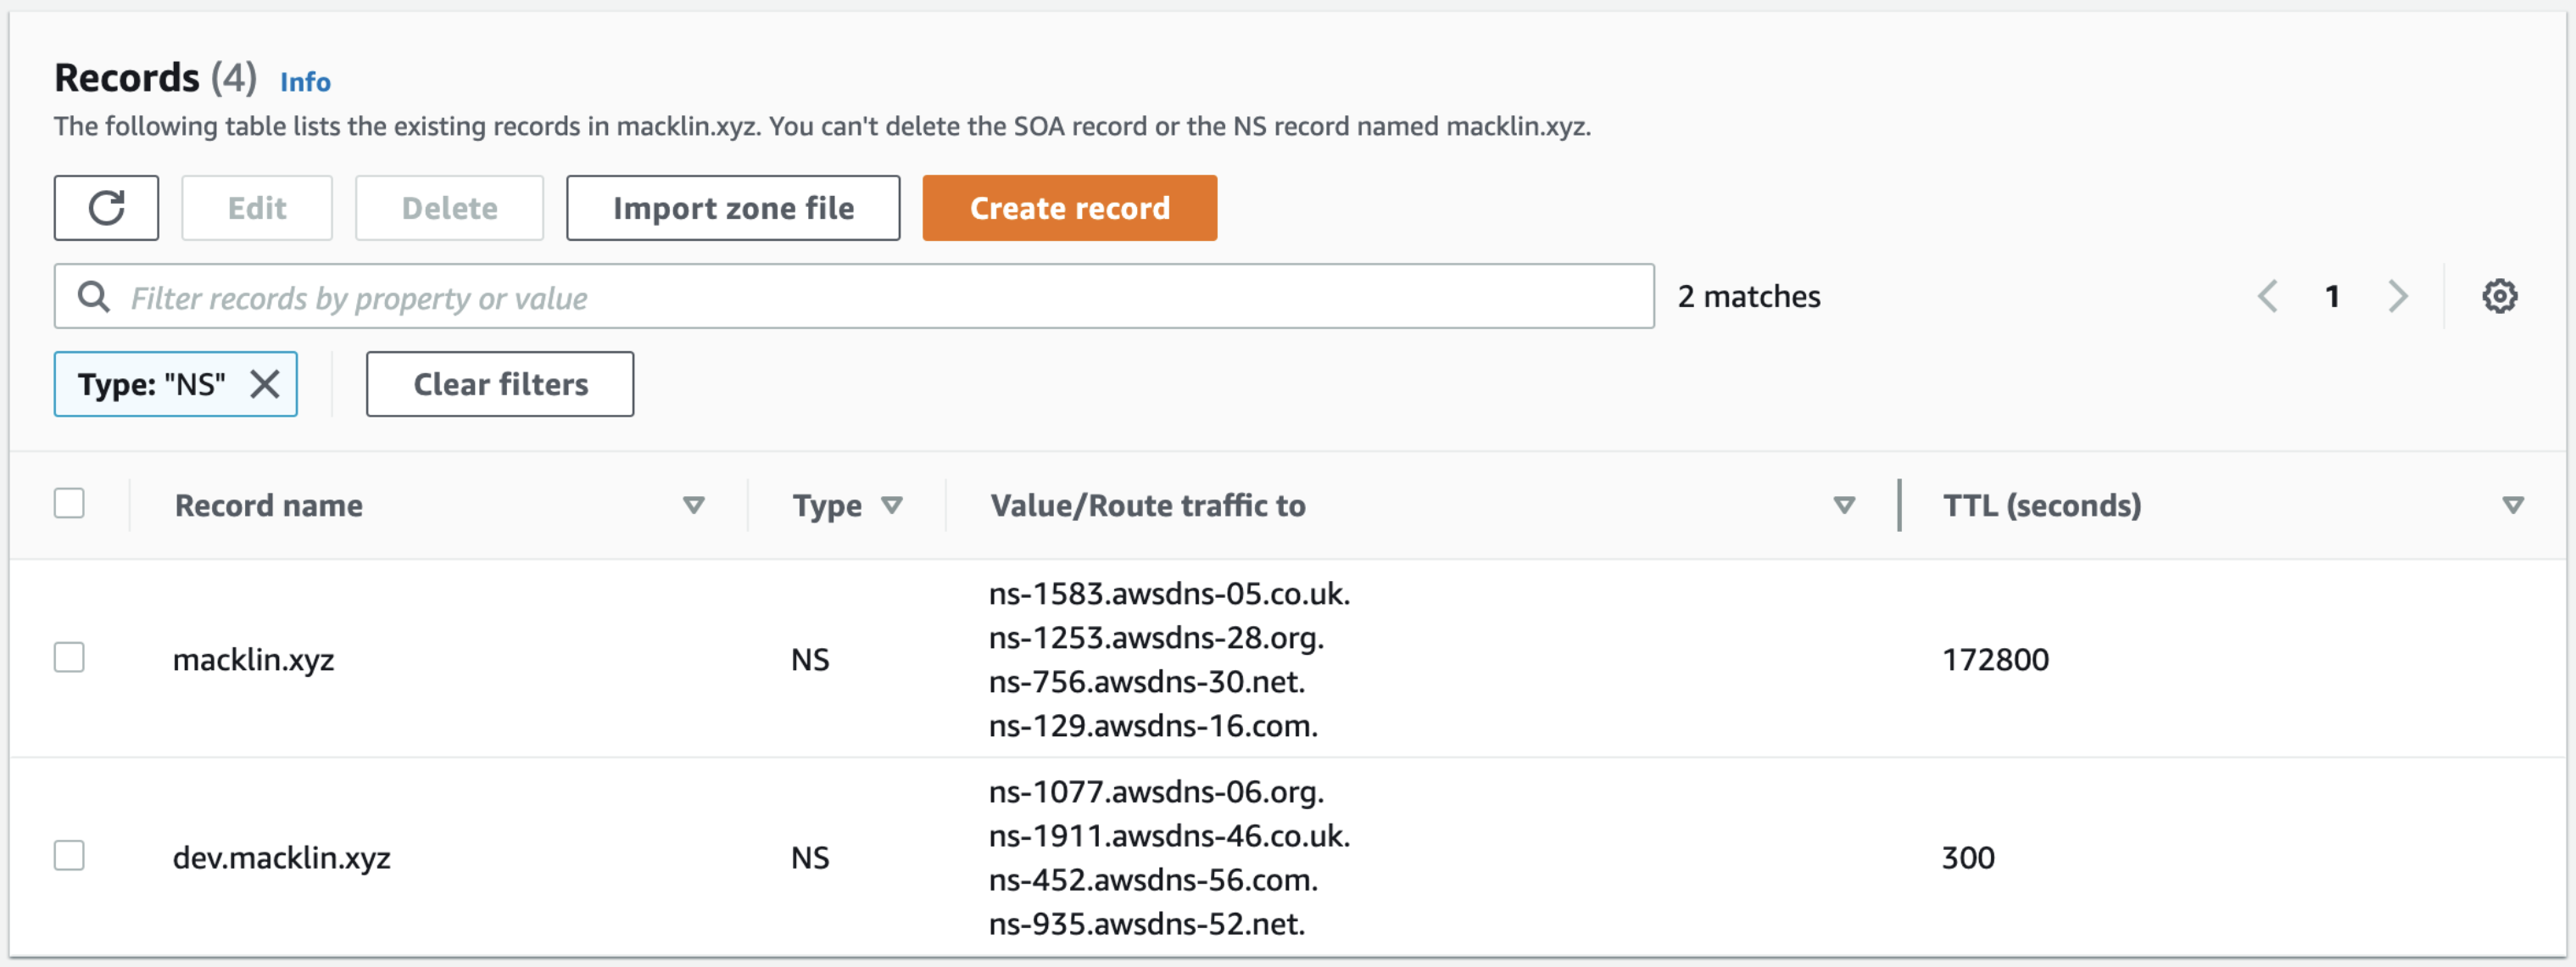
Under Route 53 in the AWS Console we can now view the newly created NS Records for macklin.xyz and dev.macklin.xyz.
You may know that DNS propagation can take up to 30 minutes, so now is a good time to take a coffee or tea break. In the meantime, you can confirm DNS propagation status using an online tool, or by using the dig CLI tool. Below is an example dig output for the Development environment;
$ dig dev.macklin.xyz -t NS
;; ANSWER SECTION:dev.macklin.xyz.  172800  IN  NS  ns-1077.awsdns-06.org.dev.macklin.xyz.  172800  IN  NS  ns-1911.awsdns-46.co.uk.dev.macklin.xyz.  172800  IN  NS  ns-452.awsdns-56.com.dev.macklin.xyz.  172800  IN  NS  ns-935.awsdns-52.net.
And below is an example output for the Production environment, noting that the answer section contains different NS Records to the Development environment;
$ dig macklin.xyz -t NS
;; ANSWER SECTION:macklin.xyz.    172800  IN  NS  ns-1253.awsdns-28.org.macklin.xyz.    172800  IN  NS  ns-129.awsdns-16.com.macklin.xyz.    172800  IN  NS  ns-1583.awsdns-05.co.uk.macklin.xyz.    172800  IN  NS  ns-756.awsdns-30.net.
Pricing
Cost can vary depending on the TLD of the domain you select. The cost of my .xyz domain is US$12.00/year (AU$16.29/year at the time of writing). The costs associated with AWS, including Route53 and Certificate Manager are US$13.20/year (AU$17.76/year at the time of writing).
Resources
The CloudFormation templates and install scripts are made available in the following Github repository;
https://github.com/Macca2805/blog-aws-route-53-subdomains
This post expands on the following post from https://serverless-stack.com with the use of declarative infrastructure-as-code (CloudFormation) and command-line tools (AWS CLI);
https://serverless-stack.com/chapters/share-route-53-domains-across-aws-accounts.html